Building Ingress & Multi-Cluster
포스팅은 CloudNet@팀 서종호(Gasida)님이 진행하시는
AWS EKS Workshop Study 내용을 참고하여 작성합니다.

안녕하세요!
오늘은 클러스터 내부의 서비스를 외부로 노출하기 위한
Ingress 기술과 EKS 멀티 클러스터를 다뤄보도록 하겠습니다.
01. LBC + ALB(Ingress)
Ingress 동작을 설명하기 이전에 앞서 전 포스팅 내용 중 LoadBalancer Controller 설치 방법은 참고 바랍니다.
Click here ▶ (https://ssunghwan.tistory.com/65)
LBC를 생성하기 위해 IAM Policy, IRSA를 생성하여 적용하는데요, 구성에 대해서 살펴보겠습니다.
LB Controller는 파드(컨테이너) 입니다. 파드가 AWS API를 호출하려면 어떻게 권한을 받을까?
📌 IAM Policy를 왜 생성할까?
LB Controller는 "Ingress 리소스를 감지하면 AWS API를 호출해서 ALB를 생성" 합니다.
여기서 핵심은 AWS API 호출 입니다. ALB를 만들고, 타겟 그룹을 등록하고, 보안 그룹을 수정하는 건 전부
AWS 리소스 조작입니다. AWS는 인증된 주체만 이걸 할 수 있도록 IAM으로 제어해요.
📌 IAM Role을 적용하자.
Policy를 실제로 누군가에게 주려면 IAM Role에 붙여야 합니다.
IAM Role은 사람이 아니라 시스템/서비스가 임시로 assume하는 신분증개념이라고 보시면 될 것 같습니다.
하지만, 파드가 어떻게 이 IAM Role을 assume이 가능할까?
일반 EC2 인스턴스라면 Instance Profile로 자동으로 IAM Role을 받습니다. 하지만 Kubernetes 파드는 EC2가 아니죠
파드는 그냥 컨테이너 프로세스일 뿐입니다.
EC2의 Instance Profile 자격증명을 공유하면 그 노드 위의 모든 파드가 동일한 권한을 갖게 되는데, 이건 최소 권한 원칙 위반입니다.
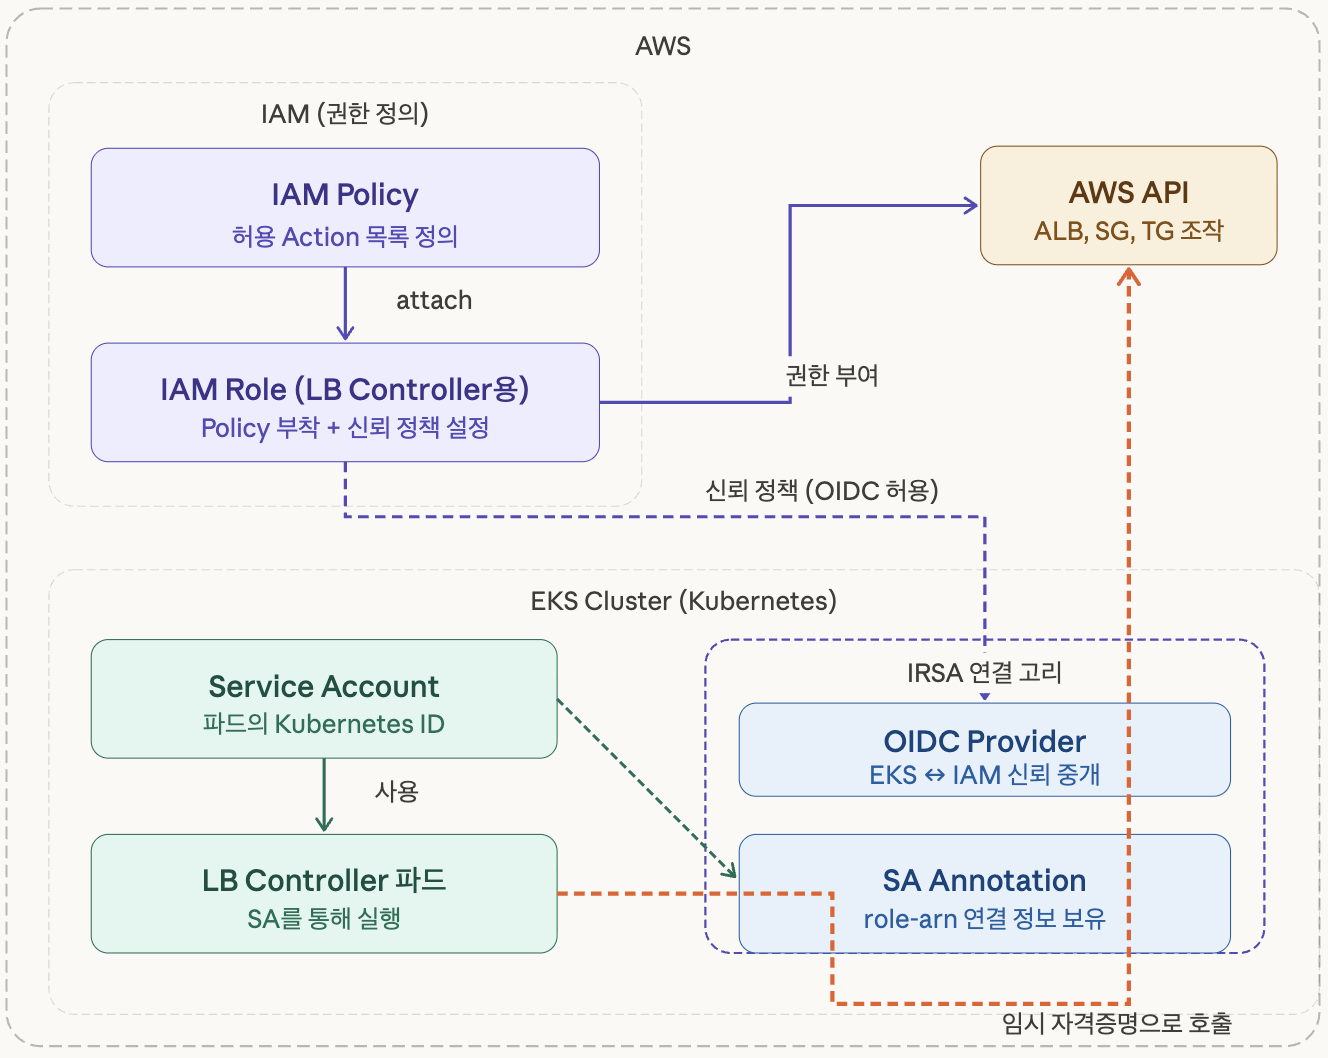
📌 IRSA (IAM Roles for Service Accounts) : 파드에게 안전하게 Role을 위임하는 방법
IRSA는 Kubernetes의 ServiceAccount와 IAM Role을 연결하는 메커니즘입니다
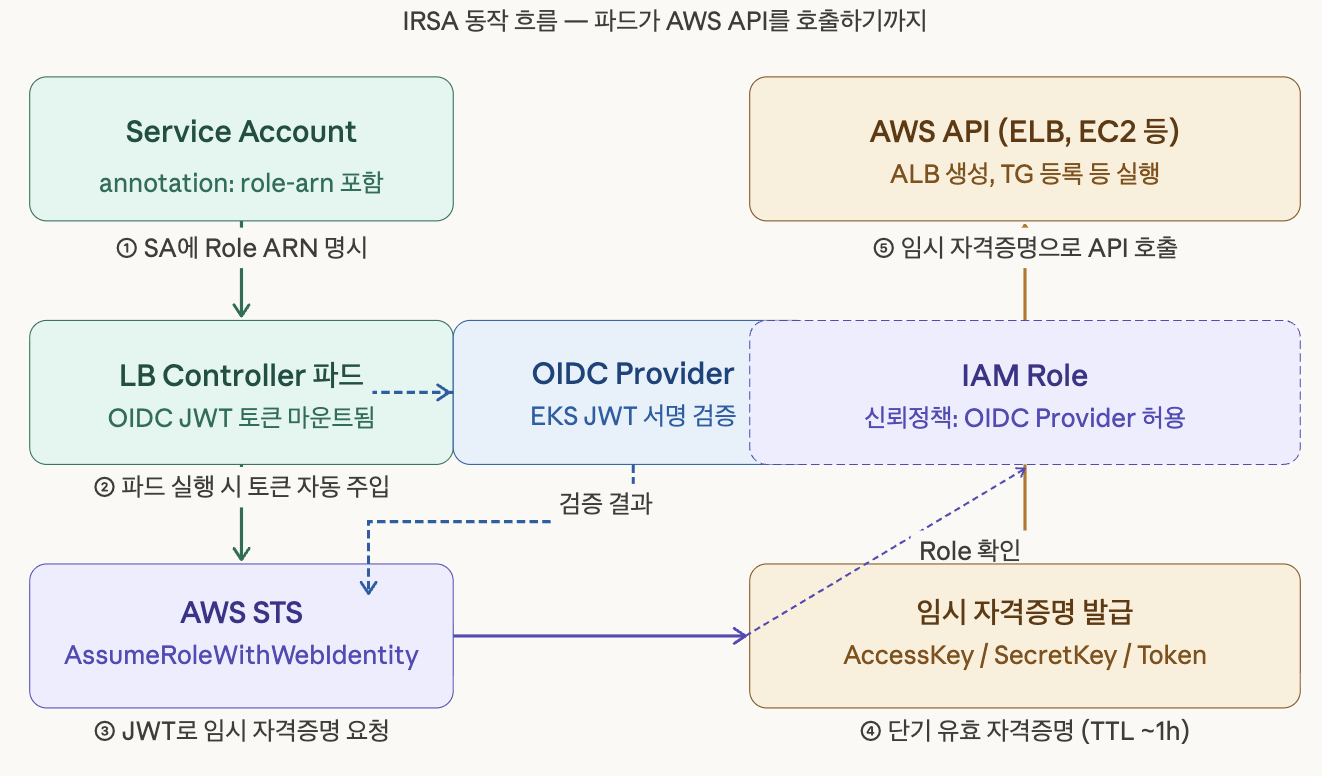
동작 원리는 아래와 같습니다.
1. ServiceAccount에 eks.amazonaws.com/role-arn annotation을 달아서 "이 SA를 쓰는 파드는 저 Role을 assume할 자격이 있다"고 선언

2. 파드가 뜰 때 Kubernetes가 자동으로 OIDC JWT 토큰을 파드 내부에 마운트
   (/var/run/secrets/eks.amazonaws.com/serviceaccount/token)

3. 파드(LB Controller)가 AWS API를 호출하기 전에 이 JWT를 들고 AWS STS에 AssumeRoleWithWebIdentity를 요청

4. STS는 OIDC Provider를 통해 JWT 서명이 진짜 EKS 클러스터에서 발급된 것인지 검증하고, IAM Role의 신뢰 정책을 확인

5. 검증 통과하면 단기 임시 자격증명(~1시간)을 발급

6. 파드는 이 임시 자격증명으로 ALB 생성 같은 AWS API를 호출
즉, 파드 하나하나가 각자의 최소 권한만 갖도록 설계 된 것 입니다.
Ingress 소개
Kubernetes에서 Ingress는 클러스터 외부의 HTTP/HTTPS 트래픽을 내부 서비스로
라우팅해주는 L7(애플리케이션 계층) 로드밸런서입니다.

서비스 타입(ClusterIP, NodePort, LoadBalancer)은 그 자체로는 URL 기반 라우팅이 안 되지만!
Ingress를 쓰면 example.com/api → service-a, example.com/web → service-b
이런 식의 경로 기반 라우팅이 가능해진다.
리소스만 있다고 Ingress를 규칙을 사용할 수 있는 것이 아니라, Controller가 있어야 겠죠?
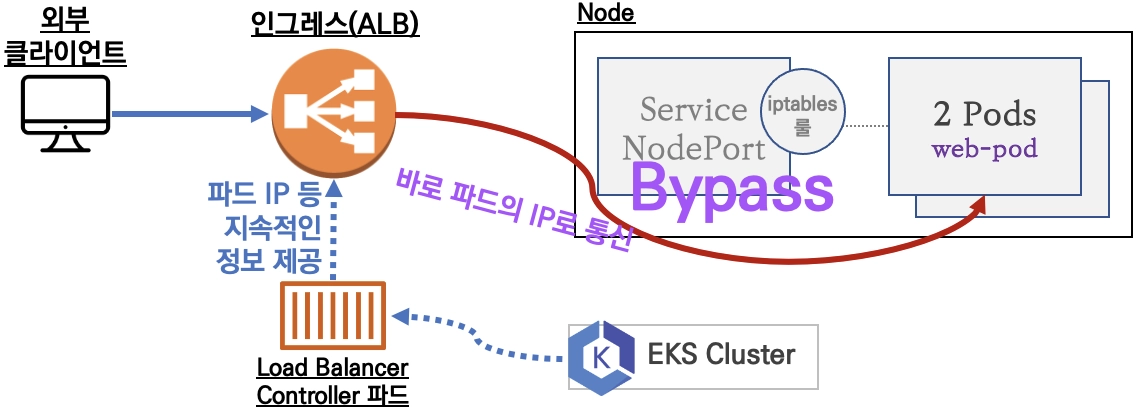
📌 Ingress Controller
AWS EKS에서는 AWS Load Balancer Controller를 설치해서 ALB를 자동 생성하게 합니다.
- ALB가 Service/NodePort를 건너뛰고 파드 IP로 직접 통신합니다.
이전 포스팅에서 IP Mode vs Instance type Mode 비교하였던 걸 참고하시면 됩니다!
02. 직접 Ingress를 배포해보기.
실습을 위해서 인그레스와 게임 파드와 서비스를 함께 배포 해보도록 하겠습니다.
(LoadBalacner Controller의 파드 상태가 Running 으로 띄워져 있어야 로드밸런서가 생성됩니다)
cat <<EOF | kubectl apply -f -
apiVersion: v1
kind: Namespace
metadata:
  name: game-2048
---
apiVersion: apps/v1
kind: Deployment
metadata:
  namespace: game-2048
  name: deployment-2048
spec:
  selector:
    matchLabels:
      app.kubernetes.io/name: app-2048
  replicas: 2
  template:
    metadata:
      labels:
        app.kubernetes.io/name: app-2048
    spec:
      containers:
      - image: public.ecr.aws/l6m2t8p7/docker-2048:latest
        imagePullPolicy: Always
        name: app-2048
        ports:
        - containerPort: 80
---
apiVersion: v1
kind: Service
metadata:
  namespace: game-2048
  name: service-2048
spec:
  ports:
    - port: 80
      targetPort: 80
      protocol: TCP
  type: NodePort
  selector:
    app.kubernetes.io/name: app-2048
---
apiVersion: networking.k8s.io/v1
kind: Ingress
metadata:
  namespace: game-2048
  name: ingress-2048
  annotations:
    alb.ingress.kubernetes.io/scheme: internet-facing
    alb.ingress.kubernetes.io/target-type: ip
spec:
  ingressClassName: alb
  rules:
    - http:
        paths:
        - path: /
          pathType: Prefix
          backend:
            service:
              name: service-2048
              port:
                number: 80
EOF
인그레스와 파드/서비스들이 배포가 된 것을 확인할 수 있습니다.
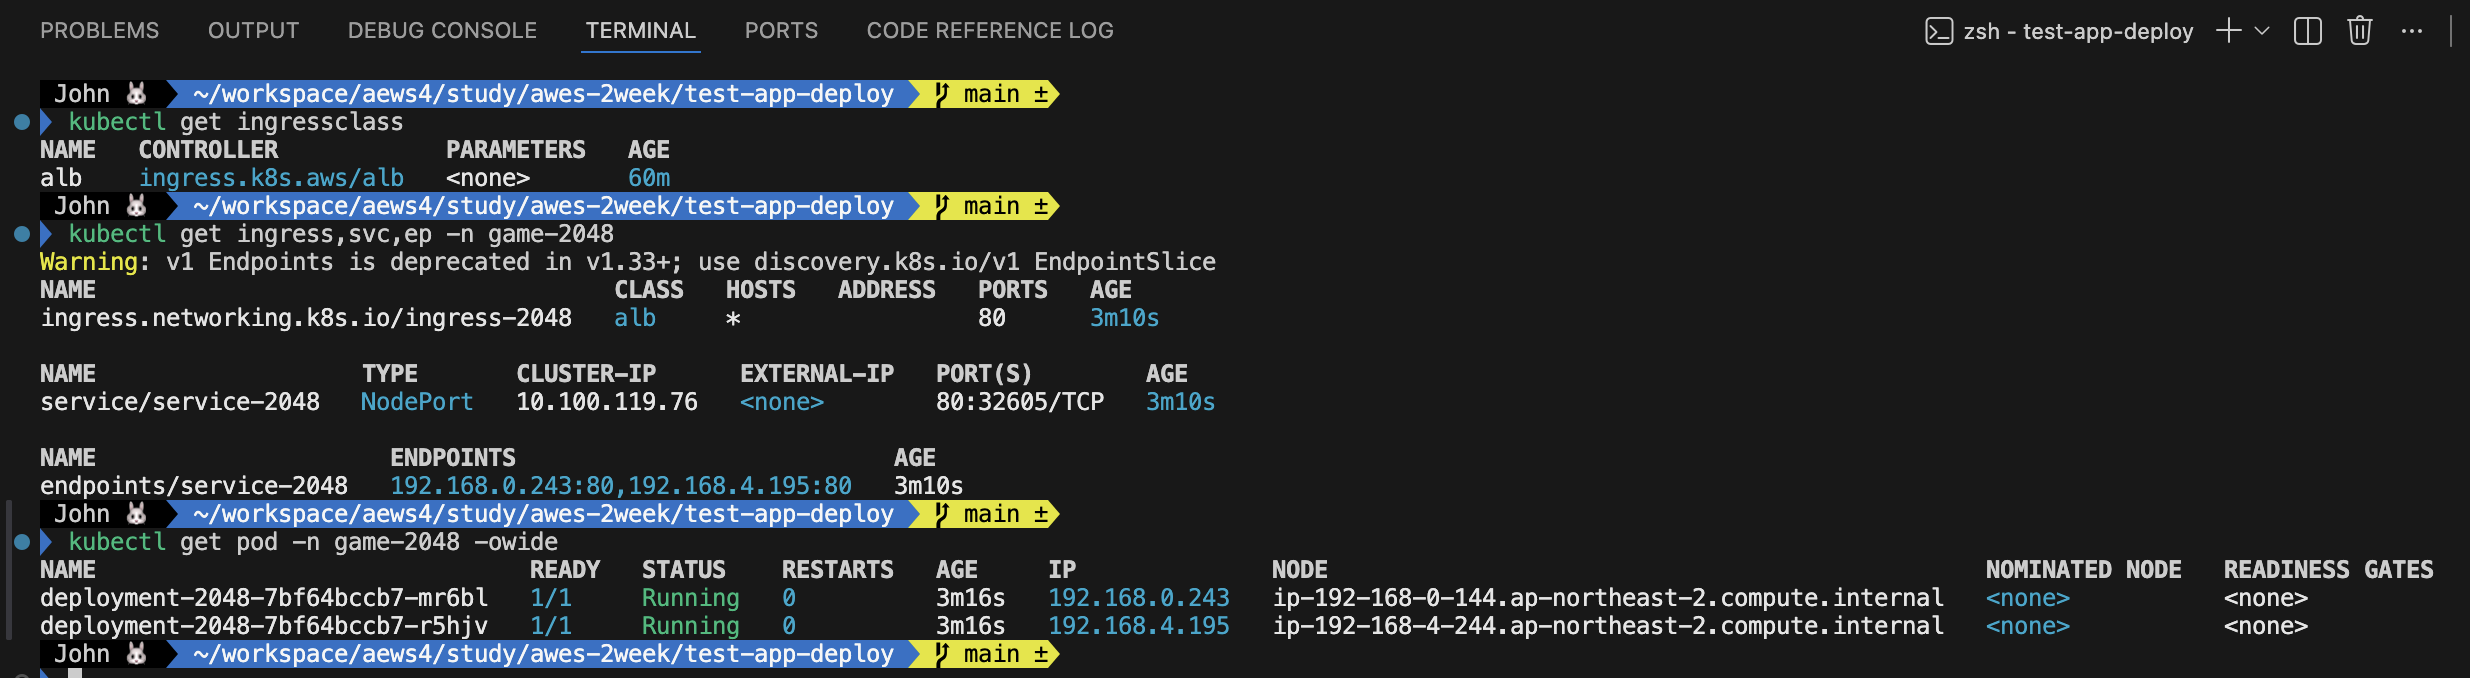
ALB도 잘 생성되었는지 확인해볼까요?
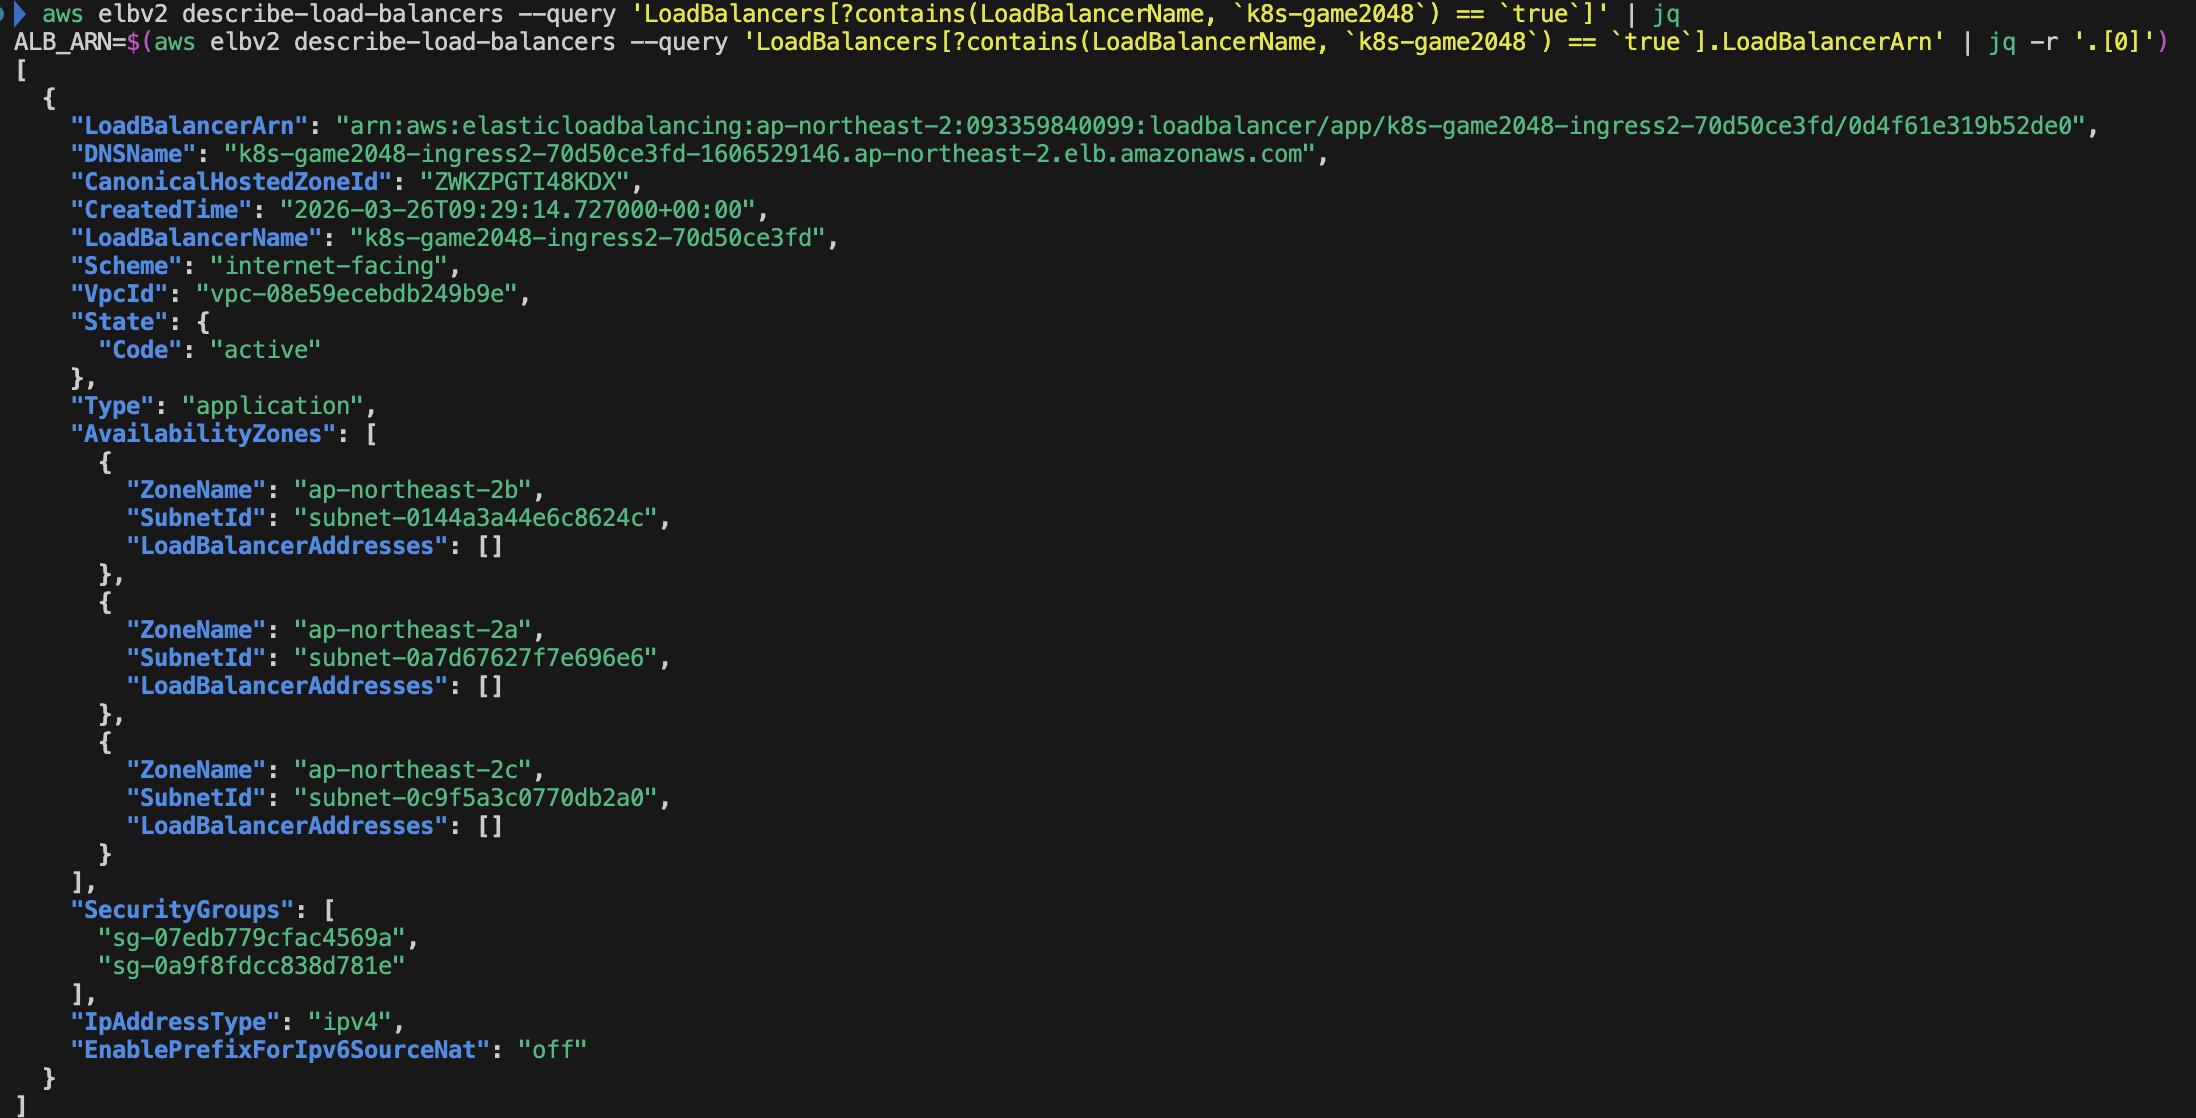
현재 리소스맵을 확인해보면, 타겟 대상들이 Pods IP로 잡혀있는 것도 확인이 가능합니다.

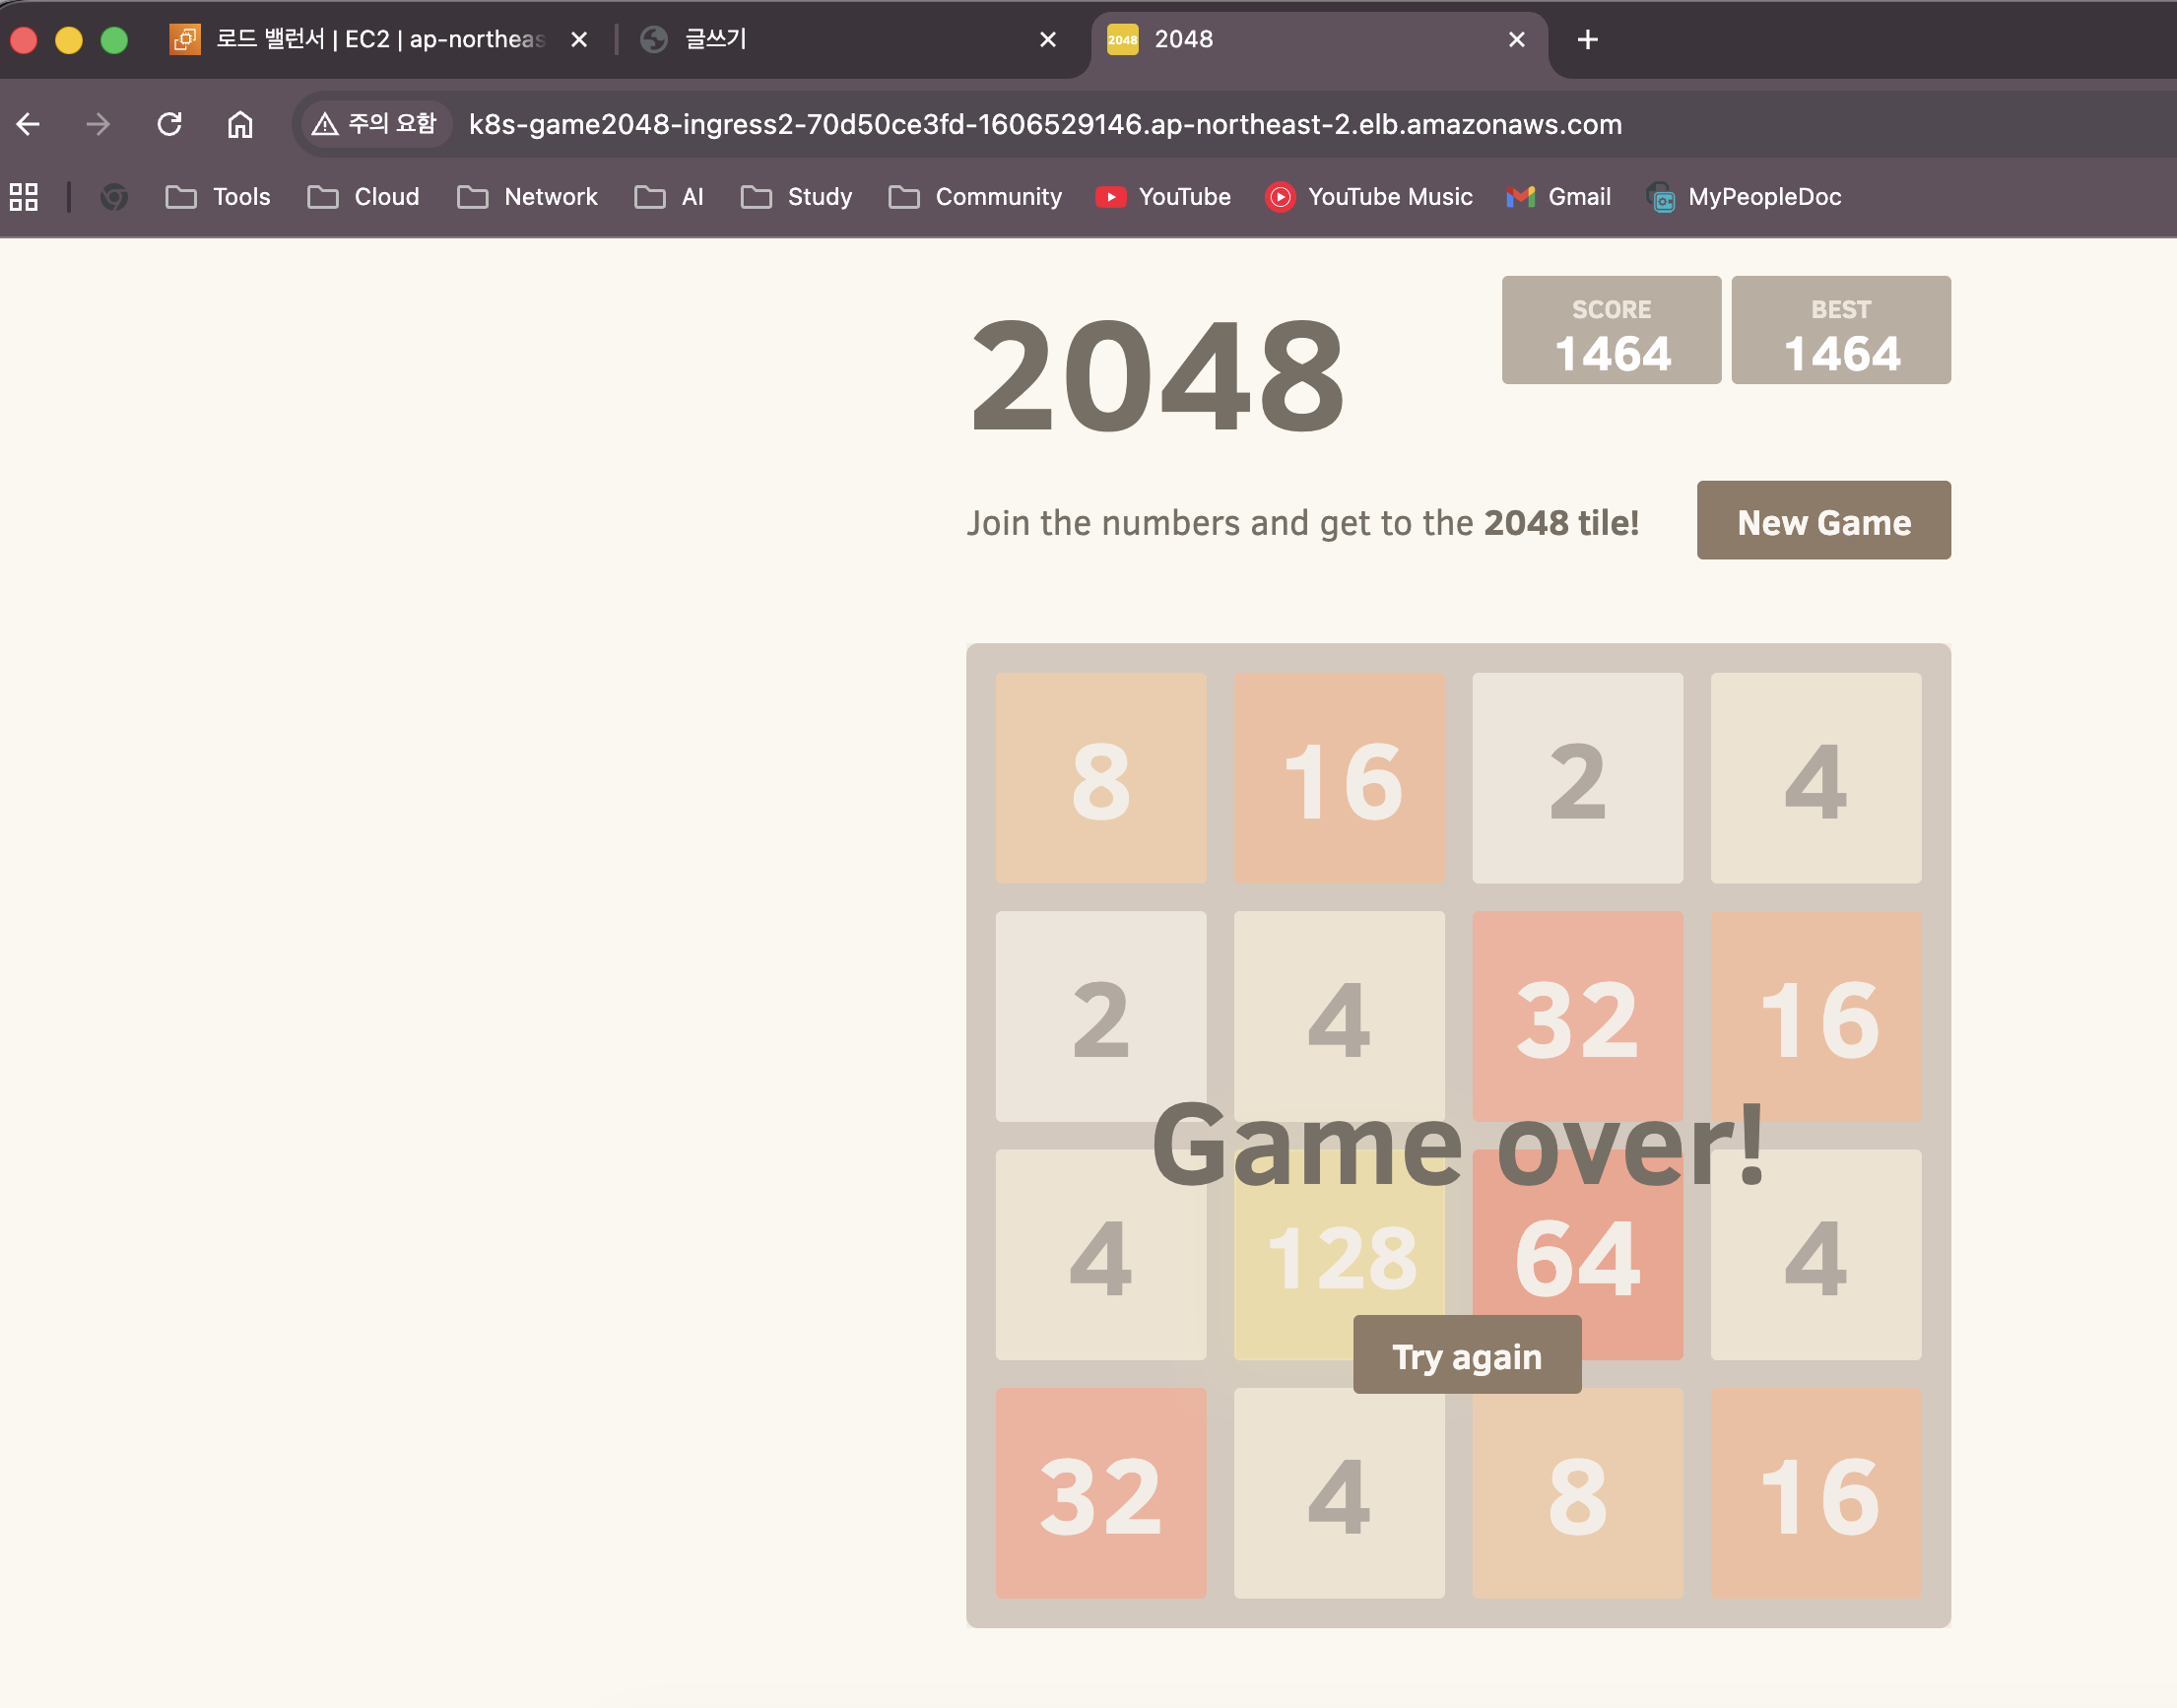
직접 ALB의 DNS주소로 브라우저에서 접근하여 게임도 가능합니다 !!
📌 이번 실습에서 Ingress를 사용한 이유
현재 게임 서비스는 path가 '/' 로 딱 하나였으므로 ALB로만 운용이 가능했습니다.
하지만 서비스가 여러개일 경우에는 서비스 마다 ALB를 생성하여 사용해야 합니다.
example.com/game  → ALB 1개 → game-service
example.com/api   → ALB 2개 → api-service
example.com/auth  → ALB 3개 → auth-service
그래서 Ingress를 사용하는 이유는 하나의 ALB로 모든 서비스를 라우팅 하기 위해서 사용합니다.
example.com/game  ↘
example.com/api   → ALB 1개 → 각 서비스로 라우팅
example.com/auth  ↗
Ingress가 ALB 단독보다 할 수 있는 것들은?
| 기능 | ALB 단독(Service LB) | Ingress + ALB |
| 경로 기반 라우팅 /api, /web | 불가 | 가능 |
| 호스트 기반 라우팅 api.example.com | 불가 | 가능 |
| HTTPS + ACM 인증서 | 가능하지만 서비스별 개별 설정 | 한 곳에서 통합 관리 |
| 여러 서비스를 ALB 1개로 통합 | 불가 | 가능 |
| 리다이렉트 (http → https) | 불가 | annotation 한 줄 |
그래서, 이번 실습에서 진행하였던 2048 게임 서비스는 Ingress 확인 동작용 예제라고 보실 수 있습니다.
서비스 하나짜리 단순한 구성으로 "Ingress + ALB Controller + IRSA" 전체 체인이 제대로 동작하는지 검증한 거고
실제 운영 환경에서는 이 위에 서비스를 여러 개 올리는 거죠.
03. EKS Multi-Cluster 구축
현재 실습은 싱글 클러스터로 구성되어 있습니다.
만약, 클러스터 단일 장애가 터지게 된다면? EKS에서 사용중인 모든 서비스가 다운되는 현상이 발생하겠죠.
그래서 클러스터를 이중화 하거나 하나 더 생성해보도록 하겠습니다.
ap-northeast-2 리전
│
├── VPC (192.168.0.0/16) ← 기존 것 공유
│   ├── Public Subnet (AZ-a, AZ-b, AZ-c)
│   └── Private Subnet (AZ-a, AZ-b, AZ-c)
│
├── EKS cluster-1 (기존 module.eks = myeks)
│   ├── Control Plane ← AWS 관리 (멀티 AZ 자동)
│   └── Node Group (EC2 워커 노드들)
│
└── EKS cluster-2 (신규 module.eks_cluster2 = myeks-cluster2)
    ├── Control Plane ← AWS 관리 (멀티 AZ 자동)
    └── Node Group (EC2 워커 노드들)
두 클러스터는 VPC만 공유하고 Control Plane, Node Group, API Server는 완전히 분리함.
📌 Terraform .tf file생성
# cluster-1(기존 module.eks)과 동일한 VPC를 공유하는 두 번째 클러스터
module "eks_cluster2" {
  source  = "terraform-aws-modules/eks/aws"
  version = "~> 21.0"

  name               = "${var.ClusterBaseName}-cluster2"
  kubernetes_version = var.KubernetesVersion

  vpc_id     = module.vpc.vpc_id        # 기존 VPC 그대로 공유
  subnet_ids = module.vpc.public_subnets

  enable_irsa                              = true
  endpoint_public_access                   = true
  endpoint_private_access                  = true
  enable_cluster_creator_admin_permissions = true
  enabled_log_types                        = []

  eks_managed_node_groups = {
    primary = {
      name                   = "${var.ClusterBaseName}-cluster2-ng"
      use_name_prefix        = false
      instance_types         = ["${var.WorkerNodeInstanceType}"]
      desired_size           = var.WorkerNodeCount
      max_size               = var.WorkerNodeCount + 2
      min_size               = var.WorkerNodeCount - 1
      disk_size              = var.WorkerNodeVolumesize
      subnets                = module.vpc.public_subnets
      key_name               = var.KeyName
      vpc_security_group_ids = [aws_security_group.node_group_sg.id]

      metadata_options = {
        http_endpoint               = "enabled"
        http_put_response_hop_limit = 2
        http_tokens                 = "required"
      }

      labels = { tier = "primary" }

      cloudinit_pre_nodeadm = [
        {
          content_type = "text/x-shellscript"
          content      = <<-EOT
            #!/bin/bash
            echo "Starting custom initialization..."
            dnf update -y
            dnf install -y tree bind-utils tcpdump nvme-cli links sysstat ipset htop
            echo "Custom initialization completed."
          EOT
        }
      ]
    }
  }

  addons = {
    coredns    = { most_recent = true }
    kube-proxy = { most_recent = true }
    vpc-cni = {
      most_recent    = true
      before_compute = true
      configuration_values = jsonencode({
        env = { WARM_ENI_TARGET = "1" }
      })
    }
  }

  tags = {
    Environment = "cloudneta-lab"
    Terraform   = "true"
  }
}
기존 내용이 담긴 테라폼 파일들은 건들이지 않고, 동일하게 eks.tf 파일을 사용해서 생성해보겠습니다.
terraform init
terraform apply -target=module.eks_cluster2
클러스터 하나를 생성해보았으니, 한번 확인해볼까요 ?
== 두 클러스터의 엔드포인트 확인 ==
# cluster-1
aws eks describe-cluster --name myeks \
--query "cluster.endpoint" --output text
# cluster-2
aws eks describe-cluster --name myeks-cluster2 \
--query "cluster.endpoint" --output text
== 두 클러스터의 상태 및 버전 확인 ==
aws eks describe-cluster --name myeks \
--query "cluster.{status:status, version:version, roleArn:roleArn}" \
--output table
aws eks describe-cluster --name myeks-cluster2 \
--query "cluster.{status:status, version:version, roleArn:roleArn}" \
--output table
== 클러스터 분리 확인 ==
# 각 클러스터 kubeconfig 등록
aws eks update-kubeconfig --name myeks --alias cluster1
aws eks update-kubeconfig --name myeks-cluster2 --alias cluster2
# 각각 독립된 노드 확인
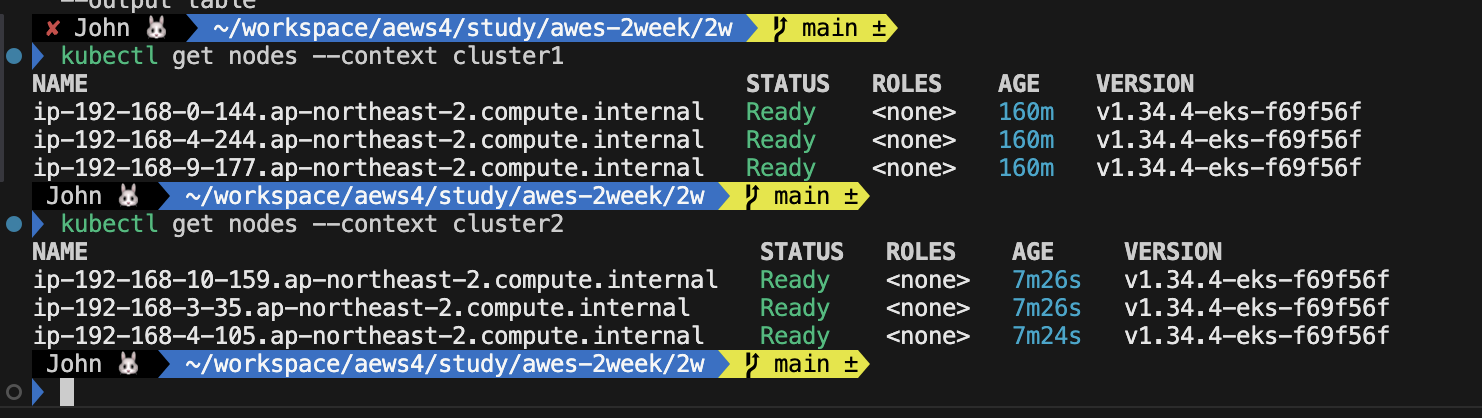
kubectl get nodes --context cluster1
kubectl get nodes --context cluster2단일 클러스터에서 멀티 클러스터로 생성 완료 하였습니다.
MultiCluster Target Groups 사용
일단 Ingess는 클러스터당 타겟 그룹이 독립적으로 생성됩니다.
cluster-1 → ALB-1 → TG-1 (cluster-1 파드만)
cluster-2 → ALB-2 → TG-2 (cluster-2 파드만)
두 클러스터를 하나의 ALB로 묶으려면 수동으로 AWS 콘솔에서 설정해야 했습니다.
(Kubernetes 네이티브 방식이 아닌거죠)
그래서 MultiCluster TargetGroups을 사용하여 ALB 1개 + 타겟 그룹 1개를 두 클러스터가 공유하도록
cluster-1 (주)  →  ALB 1개
                      ↓
cluster-2 (보조) →  TG 1개
                   ├── cluster-1 pod-1 (192.168.0.x)
                   ├── cluster-1 pod-2 (192.168.4.x)
                   ├── cluster-2 pod-1 (192.168.0.y)  ← TargetGroupBinding
                   └── cluster-2 pod-2 (192.168.4.y)  ← TargetGroupBinding
이렇게 구성해보도록 하겠습니다.
두 클러스터의 역할을 구분하자면, 아래의 표를 참고해주세요.
| cluster-1 (주 클러스터) | cluster-2 (보조 클러스터) | |
| 리소스 | Ingress | TargetGroupBinding |
| 역할 | ALB + TG 생성 | 기존 TG에 파드 IP 등록 |
| annotation | multi-cluster-target-group: "true" | multiClusterTargetGroup: true |
일반 TG vs MultiCluster TG 차이점
일반 모드에서는 LB Controller가 클러스터 파드가 죽으면 TG에서 자동으로 제거합니다.
근데 두 클러스터가 같은 TG를 공유하면 cluster-1 Controller가 cluster-2 파드를 모르는 IP라고 판단해서
지워버리는 문제가 생겨요.
MultiCluster 모드에서는 이걸 방지하기 위해 파드 IP에 클러스터 태그를 붙여서 관리합니다.
TG 등록 시:
cluster-1 파드 → tag: kubernetes.io/cluster/myeks = owned
cluster-2 파드 → tag: kubernetes.io/cluster/myeks-cluster2 = owned

→ 각 Controller는 자기 클러스터 태그가 붙은 IP만 관리
→ 다른 클러스터 IP는 건드리지 않음
도식화 해보자면 아래와 같습니다.

이렇게 된다면 HA(고가용성) 동작에 용이합니다.
이어서, cluster2에 LoadBalancer Controller를 설치하고 실습을 해보도록 하겠습니다.
방금 생성하였던 cluster2로 context를 변경하고, LoadBalancer Controller를 설치해줍니다.
설치 방법 : Click here ▶ (https://ssunghwan.tistory.com/65)
다만, IAM Policy는 이미 생성이 되어 있으므로 IRSA만 생성해서 적용시키면 될 것 같습니다.
# cluster2로 인입
kubectl config use-context cluster2
📌 IRSA 생성
# IRSA 생성 : cloudforamtion 를 통해 IAM Role 생성
eksctl create iamserviceaccount \
  --cluster=myeks-cluster2 \
  --namespace=kube-system \
  --name=aws-load-balancer-controller \
  --attach-policy-arn=arn:aws:iam::093359840099:policy/AWSLoadBalancerControllerIAMPolicy \
  --override-existing-serviceaccounts \
  --approve

# 확인
eksctl get iamserviceaccount --cluster $CLUSTER_NAME
NAMESPACE       NAME                            ROLE ARN
kube-system     aws-load-balancer-controller    arn:aws:iam::093359840099:role/eksctl-myeks-addon-iamserviceaccount-kube-sys-Role1-B7Eh3NoJ94r2

# k8s 에 SA 확인
# Inspecting the newly created Kubernetes Service Account, we can see the role we want it to assume in our pod.
kubectl get serviceaccounts -n kube-system aws-load-balancer-controller -o yaml
apiVersion: v1
kind: ServiceAccount
metadata:
  annotations:
    eks.amazonaws.com/role-arn: arn:aws:iam::911283464785:role/eksctl-myeks-addon-iamserviceaccount-kube-sys-Role1-cNSJN97wewS7
  ...
LoadBalancer Controller 파드가 실행된 것을 확인할 수 있습니다.

위 Ingress 실습에서 cluster1에 이미 Ingress를 배포하였기 때문에
cluster2와 TargetGroup을 공유하려면 cluster1의 Ingress yaml에서 annotation을 추가해야 합니다.
Step1. annotation 추가
# context 변경
kubectl config use-context cluster1

kubectl annotate ingress ingress-2048 -n game-2048 \
  alb.ingress.kubernetes.io/multi-cluster-target-group="true"
아래와 같이 annotation이 추가가 된 것을 확인할 수 있습니다.

Step 2. Target Group ARN + Security Gruop ID 추출
cluster1의 Ingress가 만든 ALB의 타깃 그룹 주소를 왜 추출할까?
- cluster2가 "나도 이 타깃 그룹에 파드 등록할게" 할 때 필요한 주소입니다.
ALB가 파드에 접근할 때 쓰는 보안 그룹을 왜 추출할까?
- cluster2 파드도 이 보안 그룹에서 오는 트래픽을 허용해야 ALB가 헬스체크를 할 수 있습니다.
export ALB_TARGET_GROUP_ARN=$(kubectl get targetgroupbindings \
  -n game-2048 \
  -l ingress.k8s.aws/stack-name=ingress-2048 \
  -o jsonpath='{.items[0].spec.targetGroupARN}')

export BACKEND_SG_ID=$(kubectl get targetgroupbindings \
  -n game-2048 \
  -l ingress.k8s.aws/stack-name=ingress-2048 \
  -o jsonpath='{.items[0].spec.networking.ingress[0].from[0].securityGroup.groupID}')

echo "TG ARN: $ALB_TARGET_GROUP_ARN"
echo "SG ID : $BACKEND_SG_ID"
추출된 것을 확인하였다면, Step 3으로 넘어가시면 됩니다.

Step3. cluster2에 TargetGroupBinding 생성
cluster2에도 똑같이 위에서 배포하였던 게임 파드와 서비스를 배포해줍니다.
kubectl config use-context cluster2

cat <<EOF | kubectl apply -f -
apiVersion: apps/v1
kind: Deployment
metadata:
  namespace: game-2048
  name: deployment-2048
spec:
  selector:
    matchLabels:
      app.kubernetes.io/name: app-2048
  replicas: 2
  template:
    metadata:
      labels:
        app.kubernetes.io/name: app-2048
    spec:
      containers:
      - image: public.ecr.aws/l6m2t8p7/docker-2048:latest
        imagePullPolicy: Always
        name: app-2048
        ports:
        - containerPort: 80
---
apiVersion: v1
kind: Service
metadata:
  namespace: game-2048
  name: service-2048
spec:
  ports:
  - port: 80
    targetPort: 80
    protocol: TCP
  type: NodePort
  selector:
    app.kubernetes.io/name: app-2048
EOF
그리고 파드와 서비스가 제대로 올라왔는지 확인 해주시구요,

이제 cluster1, cluster2에서 실행되는 파드들의 상태가 Healthy인지 확인해봅시다.
 aws elbv2 describe-target-health \
  --target-group-arn $ALB_TARGET_GROUP_ARN \
  --query 'TargetHealthDescriptions[*].{IP:Target.Id, AZ:Target.AvailabilityZone, State:TargetHealth.State}' \
  --output table
ALB 1대로, 두 클러스터 파드 4개를 바라보고 있는 아키텍처를 구성해보았습니다.
(ALB DNS 주소로 브라우저에 접속하시어 게임 서비스도 같이 이용해보시기 바랍니다)
멀티 클러스터로 트래픽 분산 확인
먼저, 게임 파드와 서비스를 트래픽 분산 확인용으로 쉽게 구별하기 위해 아래와 같이 배포
# cluster-1: 파란 배경
kubectl config use-context cluster1
cat <<EOF | kubectl apply -f -
apiVersion: v1
kind: ConfigMap
metadata:
  name: cluster-id
  namespace: game-2048
data:
  index.html: |
    <!DOCTYPE html>
    <html>
    <body style="background-color:lightblue; text-align:center; padding:100px">
    <h1 style="font-size:80px">Cluster 1</h1>
    </body>
    </html>
---
apiVersion: apps/v1
kind: Deployment
metadata:
  namespace: game-2048
  name: deployment-2048
spec:
  replicas: 2
  selector:
    matchLabels:
      app.kubernetes.io/name: app-2048
  template:
    metadata:
      labels:
        app.kubernetes.io/name: app-2048
    spec:
      containers:
      - name: app-2048
        image: nginx:alpine
        ports:
        - containerPort: 80
        volumeMounts:
        - name: html
          mountPath: /usr/share/nginx/html
      volumes:
      - name: html
        configMap:
          name: cluster-id
EOF

# cluster-2: 초록 배경
kubectl config use-context cluster2
cat <<EOF | kubectl apply -f -
apiVersion: v1
kind: ConfigMap
metadata:
  name: cluster-id
  namespace: game-2048
data:
  index.html: |
    <!DOCTYPE html>
    <html>
    <body style="background-color:lightgreen; text-align:center; padding:100px">
    <h1 style="font-size:80px">Cluster 2</h1>
    </body>
    </html>
---
apiVersion: apps/v1
kind: Deployment
metadata:
  namespace: game-2048
  name: deployment-2048
spec:
  replicas: 2
  selector:
    matchLabels:
      app.kubernetes.io/name: app-2048
  template:
    metadata:
      labels:
        app.kubernetes.io/name: app-2048
    spec:
      containers:
      - name: app-2048
        image: nginx:alpine
        ports:
        - containerPort: 80
        volumeMounts:
        - name: html
          mountPath: /usr/share/nginx/html
      volumes:
      - name: html
        configMap:
          name: cluster-id
EOF
cluster1에 접근하였을 때는 파란색 배경으로, cluster2에 접근하였을 때는 초록 배경으로 나옵니다.
(ALB DNS 주소로 브라우저에서 확인 가능)
이제 ConfigMap을 수정하여 Cluster,Pod IP가 추출이 되도록 변경해줍니다.
# cluster-1
kubectl config use-context cluster1
cat <<EOF | kubectl apply -f -
apiVersion: v1
kind: ConfigMap
metadata:
  name: nginx-conf
  namespace: game-2048
data:
  default.conf: |
    server {
      listen 80;
      add_header X-Cluster "cluster-1" always;
      add_header X-Pod-IP "\$server_addr" always;
      location / {
        root /usr/share/nginx/html;
      }
    }
EOF

kubectl patch deployment deployment-2048 -n game-2048 --patch '
spec:
  template:
    spec:
      containers:
      - name: app-2048
        volumeMounts:
        - name: nginx-conf
          mountPath: /etc/nginx/conf.d
      volumes:
      - name: nginx-conf
        configMap:
          name: nginx-conf'

---
# cluster-2
kubectl config use-context cluster2
cat <<EOF | kubectl apply -f -
apiVersion: v1
kind: ConfigMap
metadata:
  name: nginx-conf
  namespace: game-2048
data:
  default.conf: |
    server {
      listen 80;
      add_header X-Cluster "cluster-2" always;
      add_header X-Pod-IP "\$server_addr" always;
      location / {
        root /usr/share/nginx/html;
      }
    }
EOF

kubectl patch deployment deployment-2048 -n game-2048 --patch '
spec:
  template:
    spec:
      containers:
      - name: app-2048
        volumeMounts:
        - name: nginx-conf
          mountPath: /etc/nginx/conf.d
      volumes:
      - name: nginx-conf
        configMap:
          name: nginx-conf'
요청마다 어느 파드로 전달이 되었는지 아래 for문을 날려서 확인해봅시다.
for i in {1..10}; do
  curl -s -o /dev/null \
    -D - http://$ALB_DNS \
    | grep -E "X-Cluster|X-Pod-IP"
  echo "---"
done
cluster1과 cluster2로 정상적으로 트래픽이 분산이 되고 있고, 실제로 클러스터 내부 파드도 분산이 되네요.

긴 글 읽어주셔서 감사합니다.
다음은 API Gateway 내용으로 만나뵙도록 하겠습니다.